Android Studio is the official IDE for Android app development. It provides the core tools needed to start developing Android apps, including Android Studio IDE and the Android SDK tools.

You can download Android Studio at http://developer.android.com/sdk/index.html. Your machine should have JDK (Java SE Development Kit) 6 or higher. If you are developing for Android 5.0+, you would need JDK 7+. JDK can be downloaded here.
Setup on Windows
To set up Android Studio on Windows, launch the .exe file and follow the setup wizard to install Android Studio and any necessary SDK tools. If you already have a copy of the SDK, choose Custom Install in the Install Type. In the SDK components uncheck SDK. You will be prompted to provide the directory where the SDK is. To access the Android SDK tools from the command line, navigate to the location where they are installed, e.g. \Users\\sdk\
Note: If the launcher script does not find where Java is installed, you need to set an environment variable indicating the correct location. To do this, select Start menu > Computer > System Properties > Advanced System Properties. Then open Advanced tab > Environment Variables and add a new system variable JAVA_HOME that points to your JDK folder e.g. C:\Program Files\Java\jdk1.7.0_21.
Setup on Mac OS X
If you have a Mac OS X machine, launch the .dmg file and drag and drop Android Studio into the Applications folder. Open Android Studio and follow the setup wizard to install any necessary SDK tools. If you already have a copy of the SDK, choose Custom Install in the Install Type. In the SDK components uncheck SDK. You will be prompted to provide the directory where the SDK is. To access the Android SDK tools from the command line, navigate to /Users/Library/Android/sdk/
Note: If you see a warning when opening Android Studio that says the package is damaged and should be moved to the trash, go to System Preferences > Security & Privacy and under Allow applications downloaded from, select Anywhere. Then open Android Studio again.
Setup on Linux
On Linux, unpack the downloaded Android Studio ZIP file into your preferred location. To launch Android Studio, navigate to the android-studio/bin/ directory in a terminal and execute studio.sh. Follow the setup wizard to install the SDK and any necessary SDK tools. If you already have a copy of the SDK, choose Custom Install in the Install Type. In the SDK components uncheck SDK. You will be prompted to provide the directory where the SDK is.
Note: You may add android-studio/bin/ to your PATH environment variable so that you can start Android Studio from any directory.
Note: You may also need to install the ia32-libs, lib32ncurses5-dev, and lib32stdc++6 packages to support 32-bit apps on a 64-bit machine.
Adding SDK Packages
After setting up Android Studio, you need to add SDK packages using the SDK Manager. To open the SDK Manager from Android Studio, select Tools > Android > SDK Manager or click SDK Manager ( ) in the toolbar. You may need to click the "Launch Standalone SDK Manager" link to display the SDK Manager. On Windows, you can double-click the SDK Manager.exe file at the root of the Android SDK directory. On Mac or Linux, open a terminal and navigate to
 /tools directory, then execute android sdk
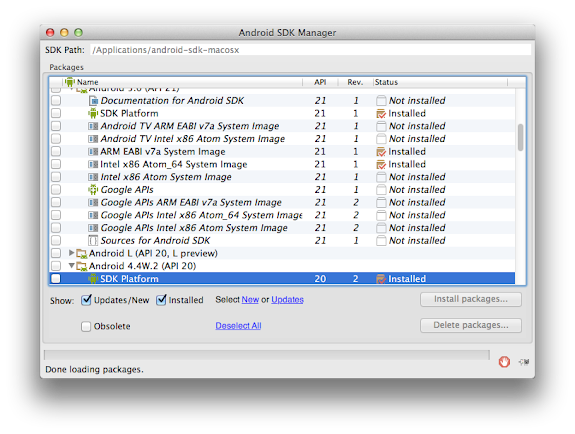
Download the following packages from the SDK manager:
- Tools
- Android SDK Tools
- Android SDK Platform-tools
- Android SDK Build-tools (latest version)
- The latest Android (Android X.X) folder
- SDK Platform
- A System image for creating emulators: ARM EABI v7a System Image or Intel x86 Atom System Image
- Samples for SDK (optional)
- Documentation (optional)
- Extras
- Android Support Repository
- Android Support Library
- Google Repository (if you will be using Google Play Services APIs)
- Google Play services (if you will be using Google Play Services APIs)
You have now successfully installed Android Studio. It is now time to build awesome Android apps. If you are new to using Android Studio, you can check this DevByte video.
No comments:
Post a Comment