Have you tried using Android Virtual Devices (commonly known as Android Emulators) and experienced how it can be really slow most of the time? Using a real device to run your Android apps is usually faster and more efficient. However, not everyone has access to a lot of phones and tablets for testing their Android apps. Also, using an actual device and displaying the contents into your computer (like when presenting your apps to an audience) takes time and is error-prone. Another alternative to using the native Android emulator or a real- device is Genymotion.

Genymotion is a fast and easy-to-use Android emulator to run and test your Android apps. Already being used by more than 2,500,000 developers, Genymotion has 20 pre-configured devices (Nexus, HTC, LG, Motorola, Samsung, and Sony). You can also create customized phone/tablet emulators. You can also integrate it to Android Studio by installing the Genymotion plugin.
One of the cool things I like about Genymotion is that you can drag and drop an APK file into an emulator and it will automatically install it. Genymotion runs fast (even if you run multiple devices at the same time) and has a user-friendly interface. You can control sensors like battery, GPS, and accelerometer, network quality and performance, microphone, and multi-touch. It also has Java API and command-line tool.
Installing Genymotion
Genymotion is available for Windows, Mac OS X, and Linux. Your computer should have VirtualBox installed. You can download VirtualBox here.
Go to the Genymotion Downloads Page and download the one for your computer's operating system. You need to create an account to download Genymotion. There is a paid version of Genymotion but the free version is good enough for development and testing your apps.
On Windows, run the exe file you downloaded and follow the on-screen instructions. The default installation directory is C:\Program Files\Genymobile\Genymotion. If you created a Start menu folder, you can go to the Start Menu to open Genymotion. You can also click the desktop icon if you created one during the installation.
On Mac, open the dmg file you downloaded. Drag and drop Genymotion and Genymotion Shell to the Applications directory. On Linux, run the following commands:
chmod +x <Genymotion installer path>/genymotion-<version>_<arch>.bin
cd <Genymotion installer path>
./genymotion-<version>_<arch>.bin -d <Genymotion installer path>
You can run Genymotion by going to the installer path and running ./genymotion
Once you have installed Genymotion, you can now create new emulators, start them, and select them in the Device chooser window when running your application.
Genymotion Plugin for Android Studio
If you are using Android Studio, you can use Genymotion directly in the IDE. You can install the Genymotion Plugin so you won't need to open Genymotion and switch tabs while developing your app.
To download the Genymotion plugin, start Android Studio and go to File > Settings (Android Studio > Preferences on Mac). Select Plugins and click Browse repositories. Select Genymotion, click Download and install to download the plugin. Upon installation, you will see the Genymotion plugin icon in your toolbar.

Genymotion Plugin Toolbar Icon
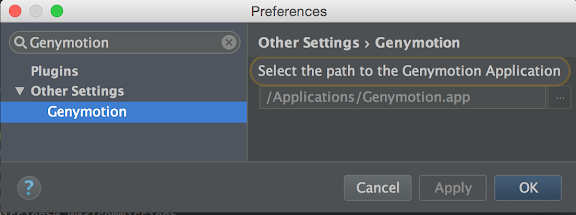
To use the plugin, click on the icon. If you are running it for the for the first time, you will be asked to to select the path to the Genymotion directory. Browse to your installation directory (something like C:\Program Files\Genymobile\Genymotion for Windows, /Applications/Genymotion.app for Mac, and /home/jomartigcal/genymotion for Linux). Click OK.
Genymotion Android Studio Plugin
If you have already specified the location of Genymotion, clicking the toolbar icon opens the Genymotion Device Manager where you can create new emulators and start existing ones.
No comments:
Post a Comment